
Do you want to create a Desktop app using React? Here’s how you do it. In this tutorial, learn how to build a cross-platform desktop application using React, Electron, and TailwindCSS. We’ll cover the basics of setting up your development environment, integrating React with Electron, and styling your app with TailwindCSS for a sleek, modern look.
Initialize your Electron App
First, we need to initialize our Electron app and install the correct template. You can name your project whatever you want, but for this tutorial, I’ll name mine codeTegaElectron. To use React with Electron, we need the webpack template. Without this, you won’t be able to follow along. Make sure you include the --template=webpack tag at the end of your npm command:
npm init electron-app@latest projectName -- --template=webpackAfter the installation is complete, navigate into your new project directory:
cd .\projectName\You’ll notice that your new folder structure is similar to a typical React application, with the src directory being the primary directory you will work out of. The webpack template includes some JavaScript files that help us run a React app.
Install Dependencies
Next, we need to install a few Babel packages. Babel helps us transpile our modern JavaScript and JSX code into a format that can be understood by all browsers.
Run the following command to install the required packages:
npm install --save-dev @babel/preset-react babel-loader @babel/coreHere’s what these packages do:
@babel/preset-react: Includes plugins to run JSX/TSX code.babel-loader: Allows transpiling JavaScript files using Babel and webpack.@babel/core: A compiler for our JavaScript.
Update Configuration
Once you have those installed we can update a few things in our configuration
Open your webpack.rules.js file. Towards the bottom, commented out you’ll see an example. We will add something similar but replace the loader with the babel loader. You’ll want this code in there.
{
  test: /\.jsx?$/,
  use: {
    loader: "babel-loader",
    options: {
      exclude: /node_modules/,
      presets: ["@babel/preset-react"],
    },
  },
},
This is a rule configuration for Webpack, specifically for handling JavaScript and JSX files.
Install React
Now, in order for us to create a desktop app using react, we need actually to install React to define the structure and behavior of our application’s UI. React’s component-based architecture makes it easier to build, manage, and scale your UI.
Run the following command to install React and React DOM:
npm install --save react react-domEven though Electron uses a version of Chromium to render content, we still need react-dom to render our React components into the DOM.
Integrate our React Logic
Next, we need to create our entry file for the React portion of the app. Inside your src directory, create a file called index.jsx. This file will serve as the starting point for our React application, similar to a standard React project.
add an index.jsx in your src directory
import * as React from 'react';
import { createRoot } from 'react-dom/client';

const root = createRoot(document.body);
root.render(<h1>Hello, world!</h1>);
Now that we have our root file we need to update our renderer.js file.
At the bottom of the file you need to replace the index.css with index.jsx
import './index.css';
import './index.jsx';
Next let’s create an App component just like we would find in a standard React app by creating App.jsx in our src directory
create App.jsx in the src directory
import React from 'react'

export default function App() {
  return (
    <div className='font-bold'>App</div>
  )
}
Start your App and Test it Out
Now test your app to make sure you are good up to this point by starting your app. Open a terminal as run:
npm startAs long as we did everything correctly the app should compile and open up.
Boom! He now have a desktop app. As you look around you’ll notice a few things. One, you’ll see a standard menu navigation that comes packaged with Electron, and second you’ll see the dev tools is open on the right side. If you are developing then having the dev tools open is great so that we can view our console logs and errors, but in production we don’t want this to be open for users. So we need to stop that from automatically opening up on load.
Remove Menu and Auto Load Dev Tools
Go to your main.js file
You’ll see this line of code. This code auto opens the dev tools on load. remove it or comment it out
// Open the DevTools.
  mainWindow.webContents.openDevTools();
update it to this
// Open the DevTools.
// mainWindow.webContents.openDevTools();
To remove the menu you need to update the createWindow function and add a parameter in the webPreferences object
Your createWindow() function should look like this
const createWindow = () => {
  // Create the browser window.
  const mainWindow = new BrowserWindow({
    width: 800,
    height: 600,
    webPreferences: {
      preload: MAIN_WINDOW_PRELOAD_WEBPACK_ENTRY,
    },
    autoHideMenuBar: true,
  });

  // and load the index.html of the app.
  mainWindow.loadURL(MAIN_WINDOW_WEBPACK_ENTRY);

  // Open the DevTools.
  // mainWindow.webContents.openDevTools();
};
The code above is adding a new variable preset in the object argument for autoHideMenuBar to have a value of true. This will hide that menu bar if you so choose. If you want to keep you then you don’t need to add that parameter.
And there we have it. Our Desktop app is created and we can now begin to create an application just like we would any other React app. This make is easy to create cross platform applications for both web based and desktop based software.
Add and Configure TailwindCSS
Now to the part everyone asked me about in my last video. How do we initialize tailwind into our desktop app?
First open a termina, and install these libraries
npm i --save-dev tailwindcss postcss-loader autoprefixer postcss- Tailwind is the nessesary library to run tailwind classes in our app.
- postcss-loader integrates this process into your Webpack build, applying transformations as part of the build pipeline.
- Autoprefixer is a PostCSS plugin that adds vendor prefixes to your CSS rules, ensuring compatibility with different browsers.
- PostCSS is a tool for transforming CSS with JavaScript plugins. It’s the core tool that postcss-loader and plugins like autoprefixer use to process CSS.
Once the install complete we need to initialize our tailwind by running npx tailwindcss init in the terminal
npx tailwindcss initThere are three libraries we generally use with tailwind, they’re common for most core components but not necessary. I’m going to install them here as they are more often used than not.
install tailwindUi plugins using the terminal
npm install @tailwindcss/forms @tailwindcss/typography @tailwindcss/aspect-ratioNow to set this up we need to open our webpack.renderer.config file and add this object to our use value.
{
      loader: "postcss-loader",
      options: {
        postcssOptions: {
          plugins: [require("tailwindcss"), require("autoprefixer")],
        },
      },
    },
Your webpack.renderer.config.js file should look like this
const rules = require("./webpack.rules");

rules.push({
  test: /\.css$/,
  use: [
    { loader: "style-loader" },
    { loader: "css-loader" },
    {
      loader: "postcss-loader",
      options: {
        postcssOptions: {
          plugins: [require("tailwindcss"), require("autoprefixer")],
        },
      },
    },
  ],
});

module.exports = {
  // Put your normal webpack config below here
  module: {
    rules,
  },
};
Now open up your webpack.rules.js and below that jsx use object we created before go ahead and add a similar object for css that should look something like this.
  {
    // loads .css files
    test: /\.css$/,
    include: [path.resolve(__dirname, "app/src")],
    use: ["style-loader", "css-loader", "postcss-loader"],
  },
Since we are including path.resolve here we need to make sure we go ahead and require that library and set it to the value of path at the top of your file
const path = require("path");Your webpack.rules.js file should look like this once added
const path = require("path");

module.exports = [
  // Add support for native node modules
  {
    // We're specifying native_modules in the test because the asset relocator loader generates a
    // "fake" .node file which is really a cjs file.
    test: /native_modules[/\\].+\.node$/,
    use: "node-loader",
  },
  {
    test: /[/\\]node_modules[/\\].+\.(m?js|node)$/,
    parser: { amd: false },
    use: {
      loader: "@vercel/webpack-asset-relocator-loader",
      options: {
        outputAssetBase: "native_modules",
      },
    },
  },
  {
    test: /\.jsx?$/,
    use: {
      loader: "babel-loader",
      options: {
        exclude: /node_modules/,
        presets: ["@babel/preset-react"],
      },
    },
  },
  {
    // loads .css files
    test: /\.css$/,
    include: [path.resolve(__dirname, "app/src")],
    use: ["style-loader", "css-loader", "postcss-loader"],
  },
  // Put your webpack loader rules in this array.  This is where you would put
  // your ts-loader configuration for instance:
  /**
   * Typescript Example:
   *
   * {
   *   test: /\.tsx?$/,
   *   exclude: /(node_modules|.webpack)/,
   *   loaders: [{
   *     loader: 'ts-loader',
   *     options: {
   *       transpileOnly: true
   *     }
   *   }]
   * }
   */
];
Now we need to update our tailwind.config.js file
tailwind.config.js
/** @type {import('tailwindcss').Config} */
module.exports = {
  content: ["./src/**/*.{html,js,jsx}"],
  theme: {
    extend: {},
  },
  plugins: [
    require("@tailwindcss/typography"),
    require("@tailwindcss/forms"),
    require("@tailwindcss/aspect-ratio"),
  ],
}
Only require the necessary plugins if you installed them. If you didn’t install them don’t add them here as it will cause an error.
Next we update our index.css file to reference tailwind css libraries
index.css
@tailwind base;
@tailwind components;
@tailwind utilities;
And finally we import the index.css into our index.jsx file!
import * as React from 'react';
import { createRoot } from 'react-dom/client';
import Home from './components/App.jsx';
import './index.css';
const root = createRoot(document.body);
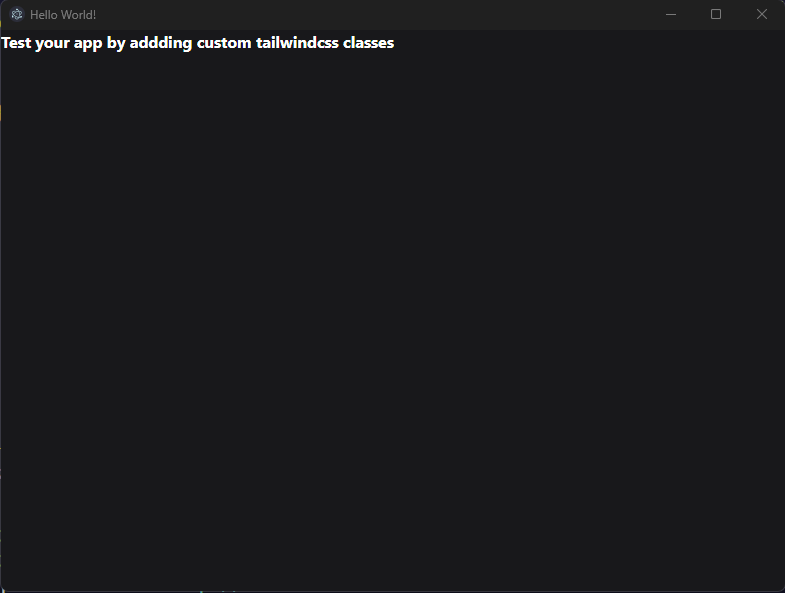
root.render(<App/>);There you have it! You successfully learned how to create a Desktop app using React. Now lets test to make sure we did everything correctly. Go ahead and start your app up again. Close it if you need to then run npm start. Go into your App.jsx file and test to make sure the classNames work with the css tags.
import React from "react";

export default function App() {
  return (
    <div className="font-bold min-h-screen h-full bg-zinc-900 text-white">
      Test your app by addding custom tailwindcss classes
    </div>
  );
}
Hopefully it’s working correctly on your end as well! If you have any questions or comments please let me know below and I’ll do my best to respond. If there is a demo you would like to see let me know as well and Ill try to put together as much of these as I can. I appreciate you! Thanks again!
Final Repo: https://github.com/CodeTega/desktopReact.git